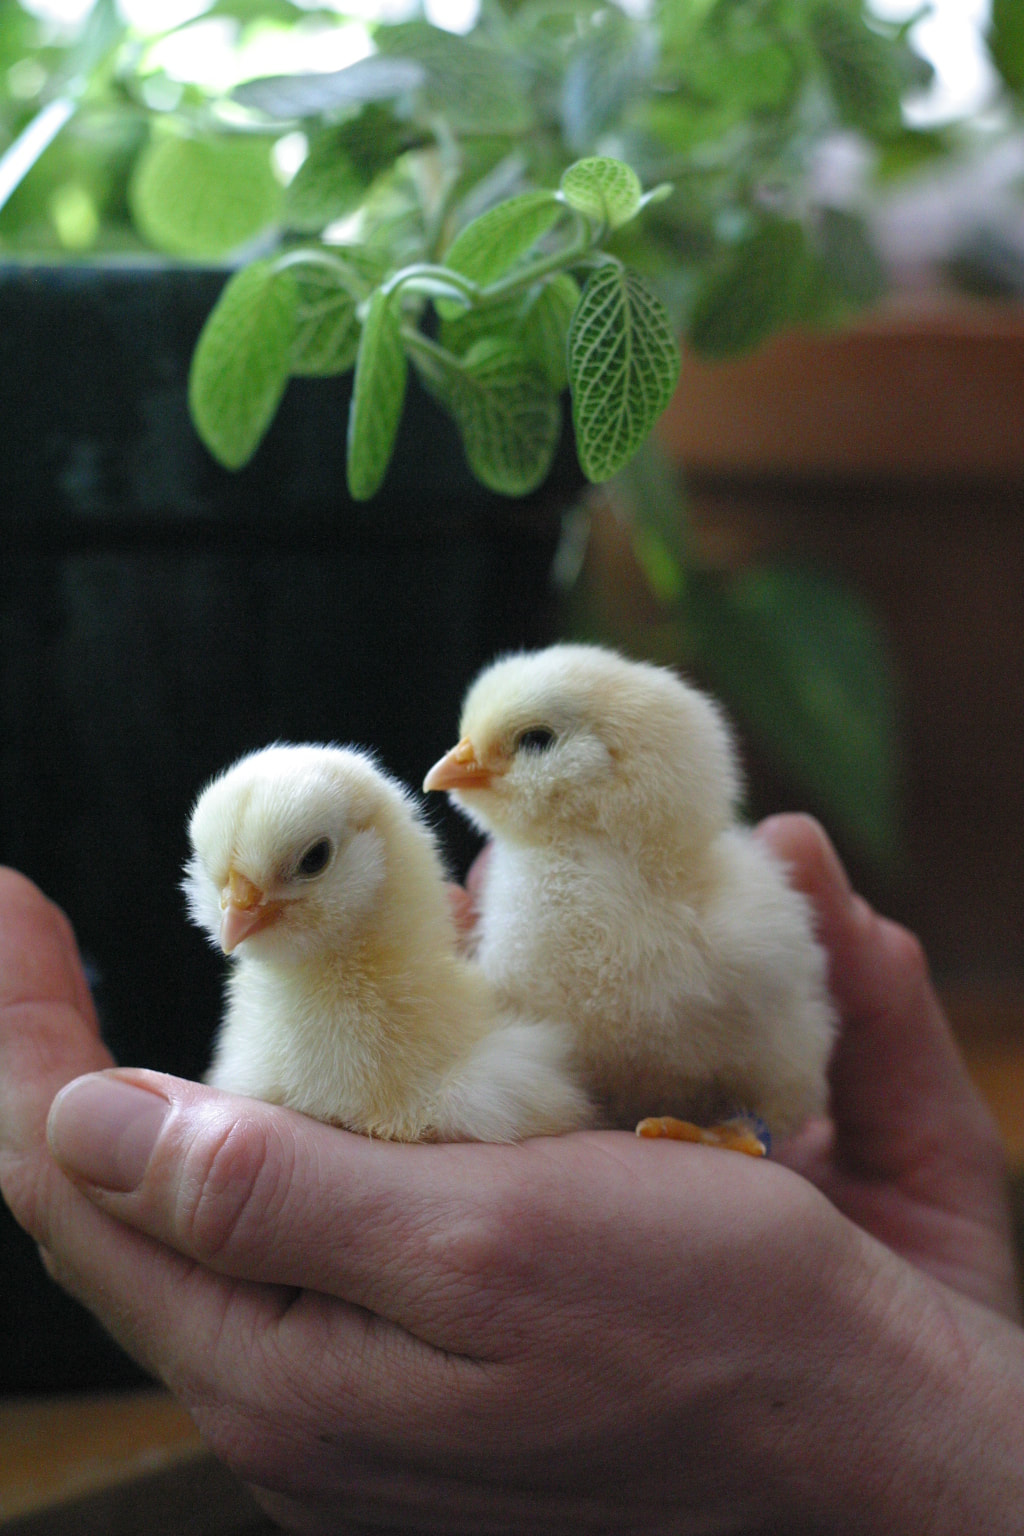
 Two bantam Salmon Faverolles from our hatch last week. What is an Eggtopsy?Spring has arrived and with it, hatching season! Perhaps you collected and incubated eggs from your own flock, or you patiently waited for eggs to arrive in the mail from a breeder. Either way, you spent 21 days incubating and anticipating the arrival of your new babies. Then hatch day came and went, and there are still some unhatched eggs sitting in the incubator, leaving you to wonder why some hatched, but these didn’t. First of all, this is totally normal. In most cases, not all the eggs you set will hatch. A good hatch rate for fertile, fresh eggs from your own yard is anything over 75%, and the average hatch rate for shipped eggs is 50%. While it’s expected that some eggs won’t hatch, those unhatched eggs can leave you guessing about what happened, and if there’s any way you can improve your hatch rate next time. To troubleshoot your hatch, you can perform an eggtopsy, otherwise known as a “breakout analysis,” on your unhatched eggs. A breakout analysis simply means opening each unhatched egg and studying its contents for clues as to why that egg didn’t hatch. An eggtopsy may not help you pinpoint the exact cause of death for each individual embryo, because there are so many factors affecting each stage of development. However, an eggtopsy will help you recognize patterns, troubleshoot issues, and possibly figure out the cause of a disappointing hatch. Even if you have great hatch rates, performing an eggtopsy is a good best practice, because it will help you learn what to look for. Doing them regularly will also help you get used to the process, which might be a little uncomfortable at first. [Note: This post is very specific to the eggtopsy process. For a general overview of the incubation and hatching process, I encourage you to check out our free guide that covers everything you need to get started hatching and brooding chicks. You can get The Complete Chick Guide right here.] 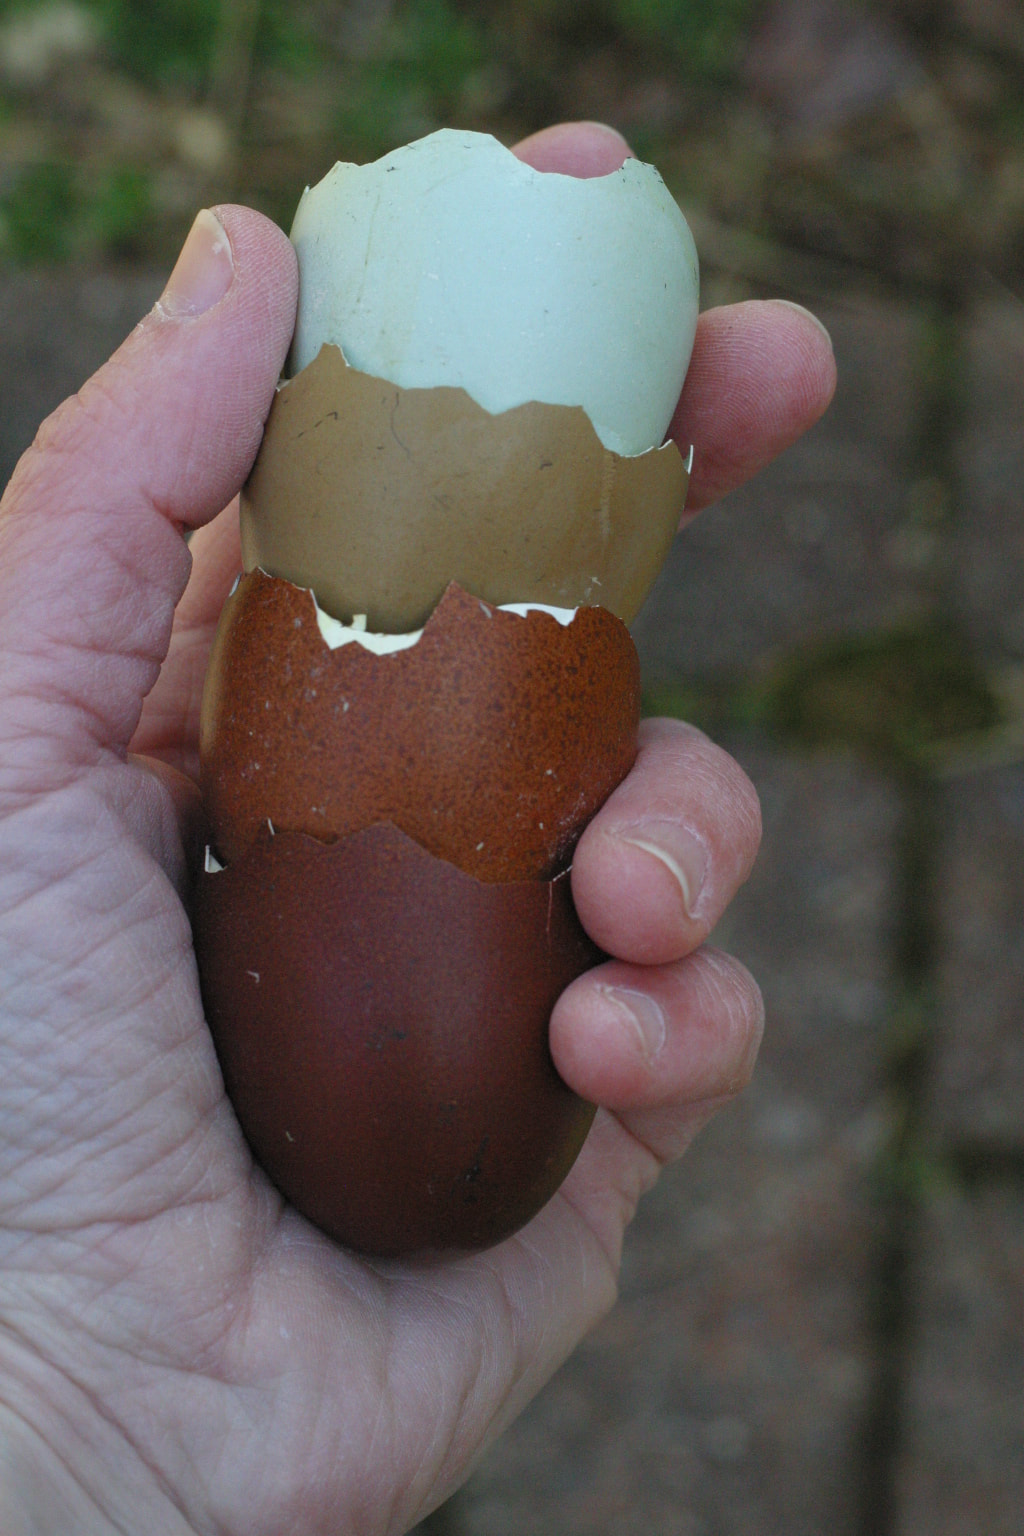 Eggshells, after the hatch. Can an eggtopsy really help me improve my hatch?Absolutely! Here are two examples of how doing a breakout analysis has helped us: During one hatch in the past, I thought it would be fun, at lockdown, to move the eggs I was incubating from my cabinet incubator to our old small tabletop model, so that I could have a better view of all those cute babies. We ended up with a hatch rate of about 50%. When I performed an eggtopsy, I found that most of the embryos that didn’t make it had died around the time of lockdown. My conclusion was that it took too long for the smaller incubator to return to the proper temp and humidity after I had opened it to add the eggs, and the eggs got chilled. Normally, when operating our tabletop incubator, there is no need to open it at lockdown. Lesson learned, and now you’ll find me watching hatches while laying on the floor, my face pressed to the door of our cabinet incubator. On another occasion, I noticed a consistently higher percentage of eggs with no development at all from one of our breeding groups. Clearly that rooster was fertile, because most of the eggs from this group were developing and hatching. Theorizing that one hen in the group was resistant to mating, I took a peek at all of the hens in this group. Each had some degree of ruffled back feathers from mating--except for one who looked completely untouched. I gave this hen and rooster some quality one-on-one time to break the ice and we’ve had no trouble since. See? Eggtopsies can be incredibly useful and give you insight into both the dynamics of your flock and issues with incubation. Knowledge of your flock, your incubator, and any unusual events (like a power outage), combined with an eggtopsy can give you some excellent insight into what affected your hatch. While a useful tool, the idea of examining a dead embryo can be a difficult one. I was incredibly nervous before I performed my first eggtopsy, but, like most things I am nervous about, it was far easier than I expected. There were no terrible smells or horrific monstrosities--just a chick that didn’t make it. I found it to be a tender and fascinating experience. If you are nervous about doing a breakout analysis, that’s okay. You got this! (You'll find photos from actual eggtopsies later in this post to help you get used to what you mind find.) How to perform an EggtopsyI'm going to walk you through the steps of a breakout analysis, and then show you a few examples from our own eggtopsies. 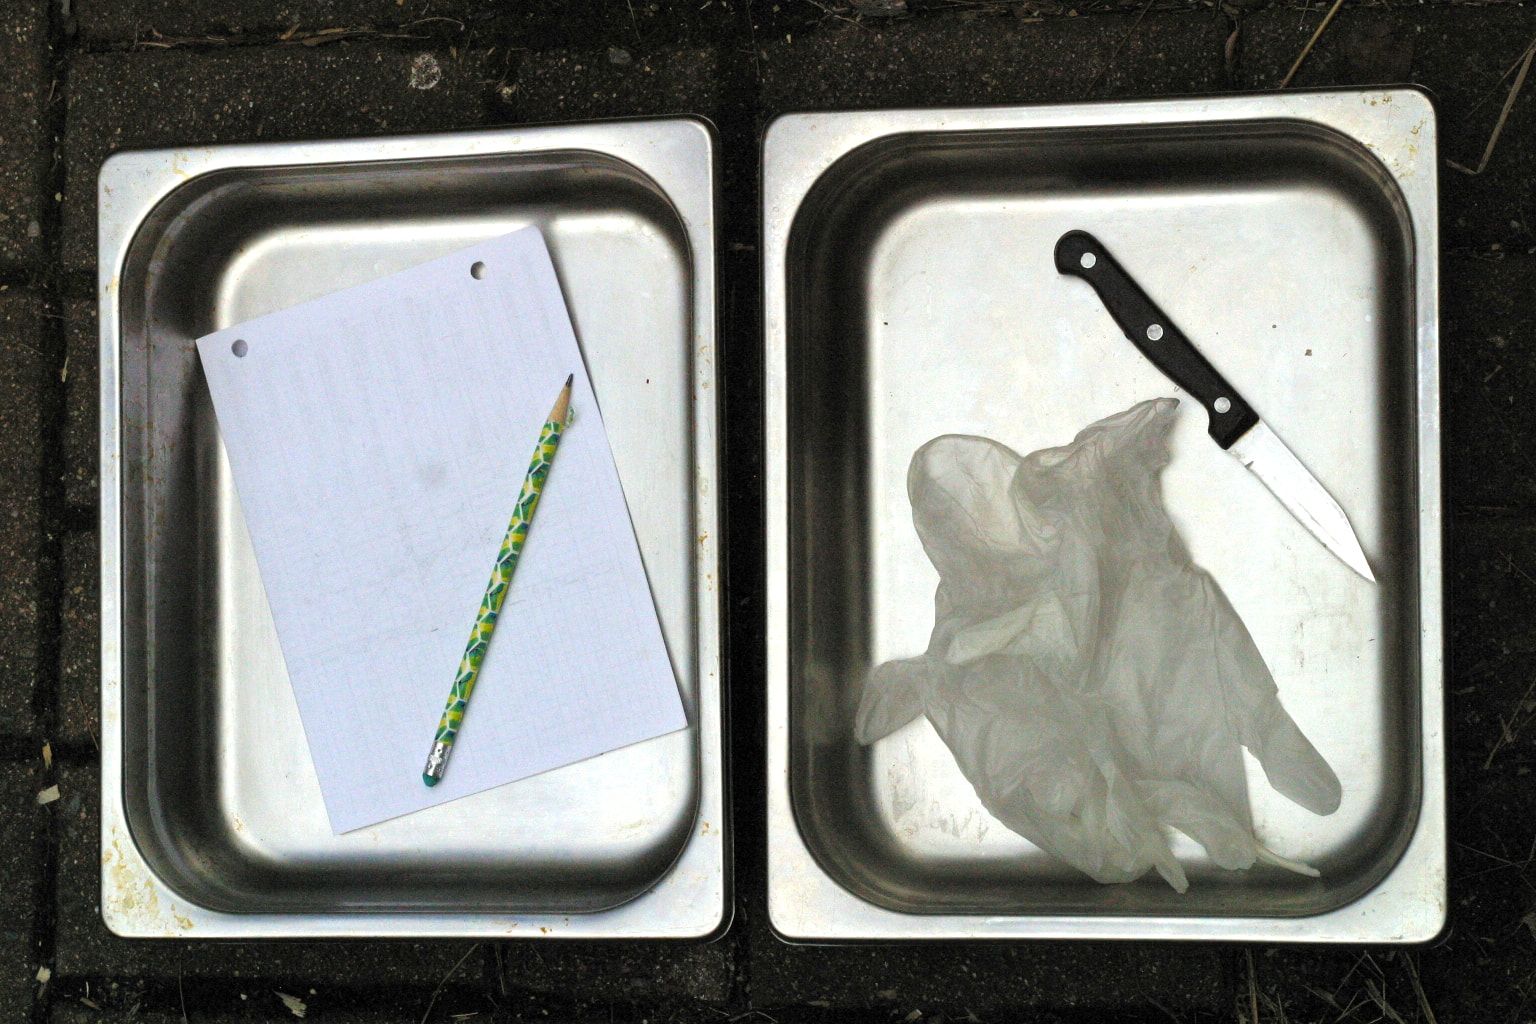 Supplies for an eggtopsy. Supplies for an eggtopsy. First, gather your materials. You will need:
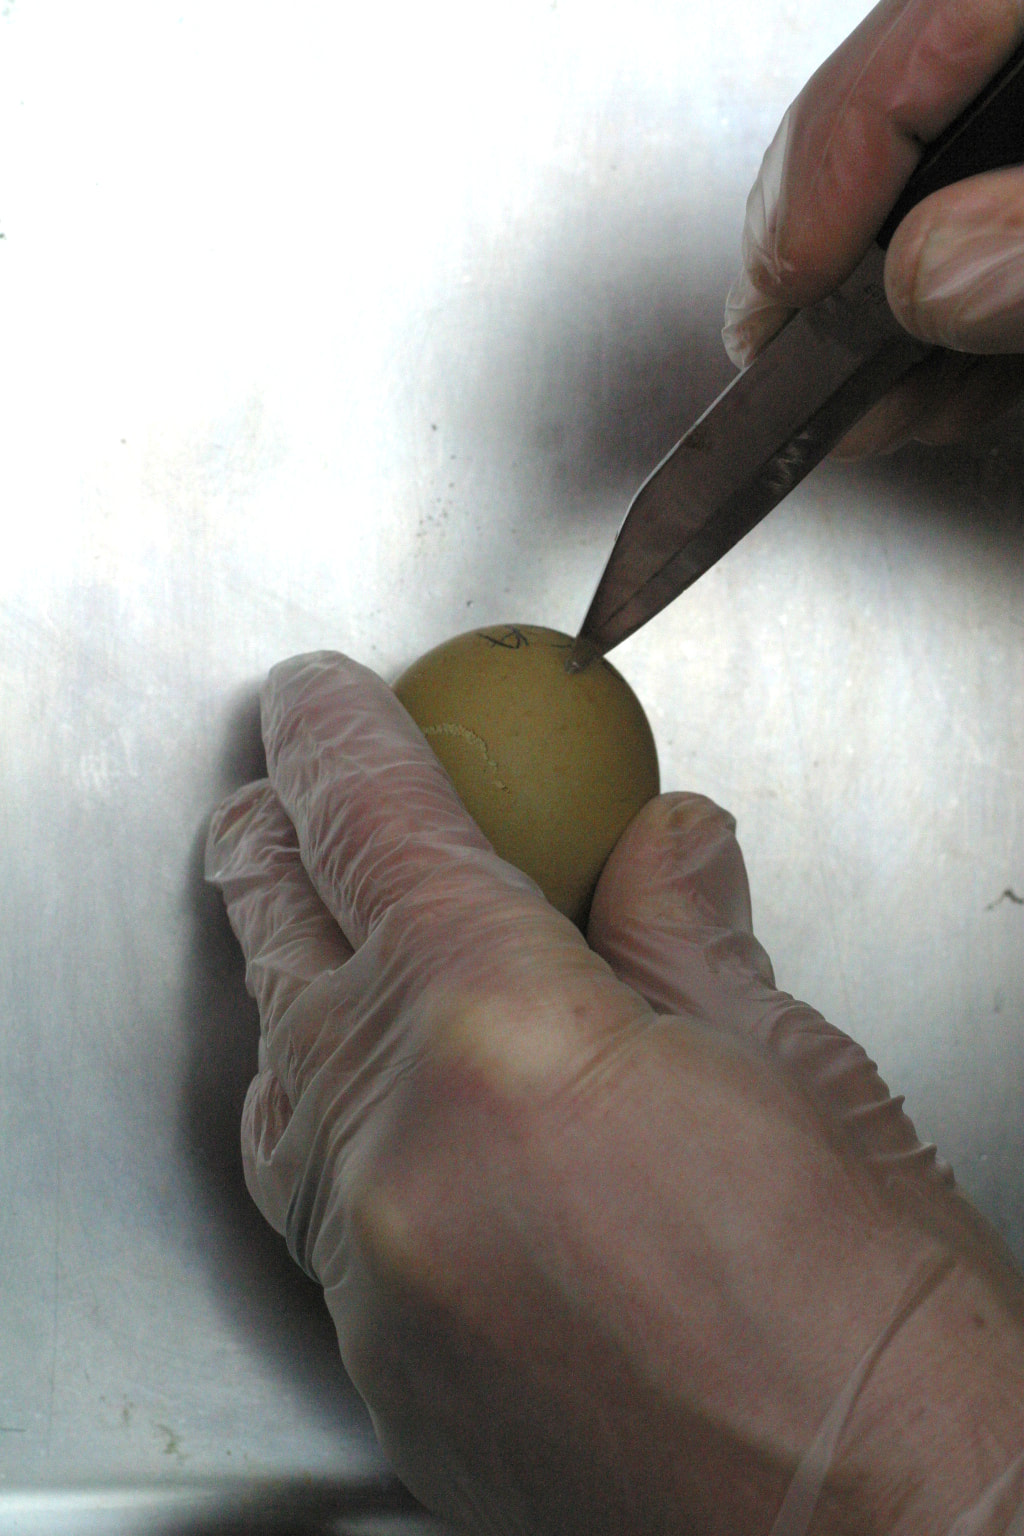
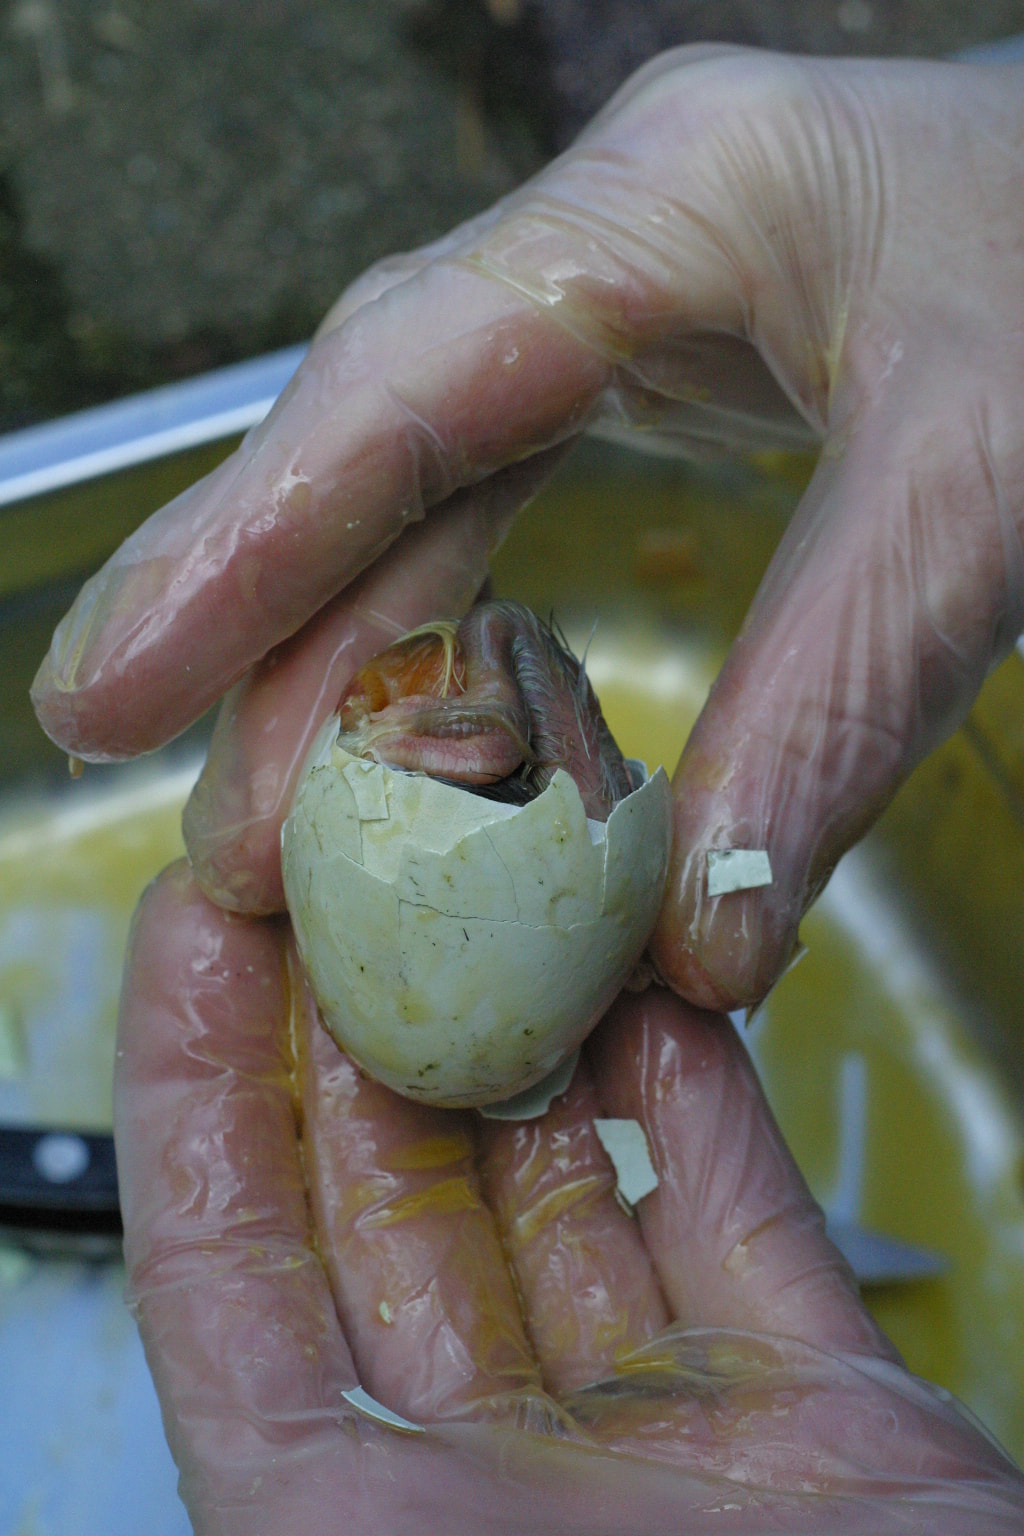
STEP ONE: Use the knife to open the large side of the egg, where the air cell is located. When opening the end of the egg, note whether or not the embryo internally pipped. If it did, you should see the beak poking through into the air sac. This is a helpful clue for later.
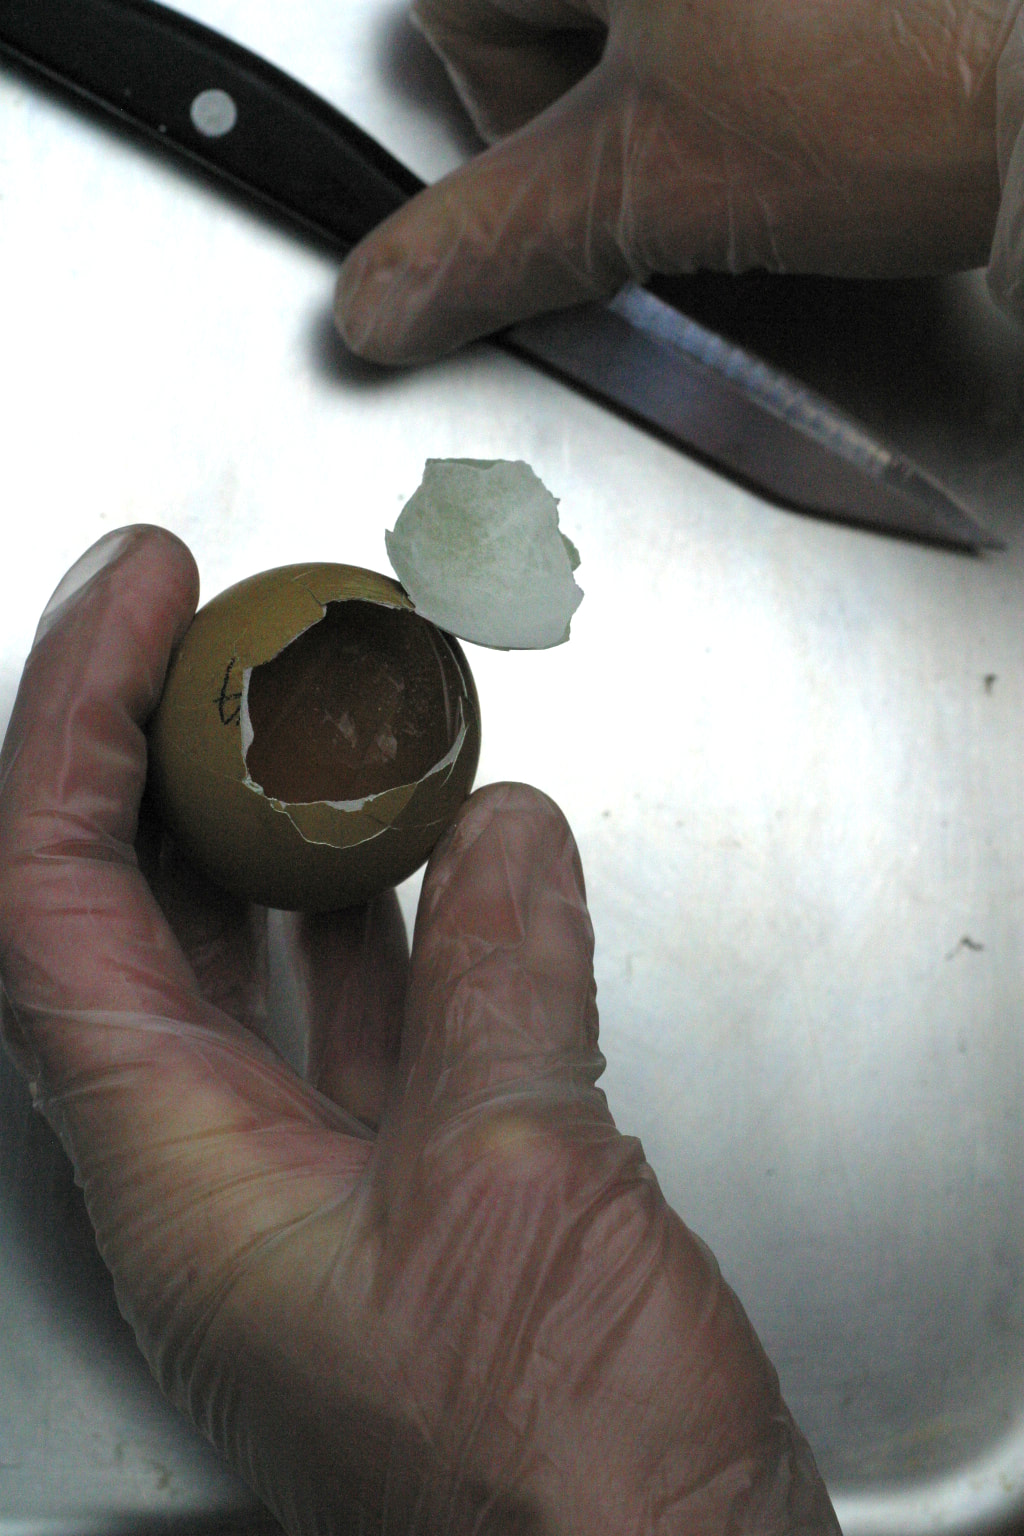
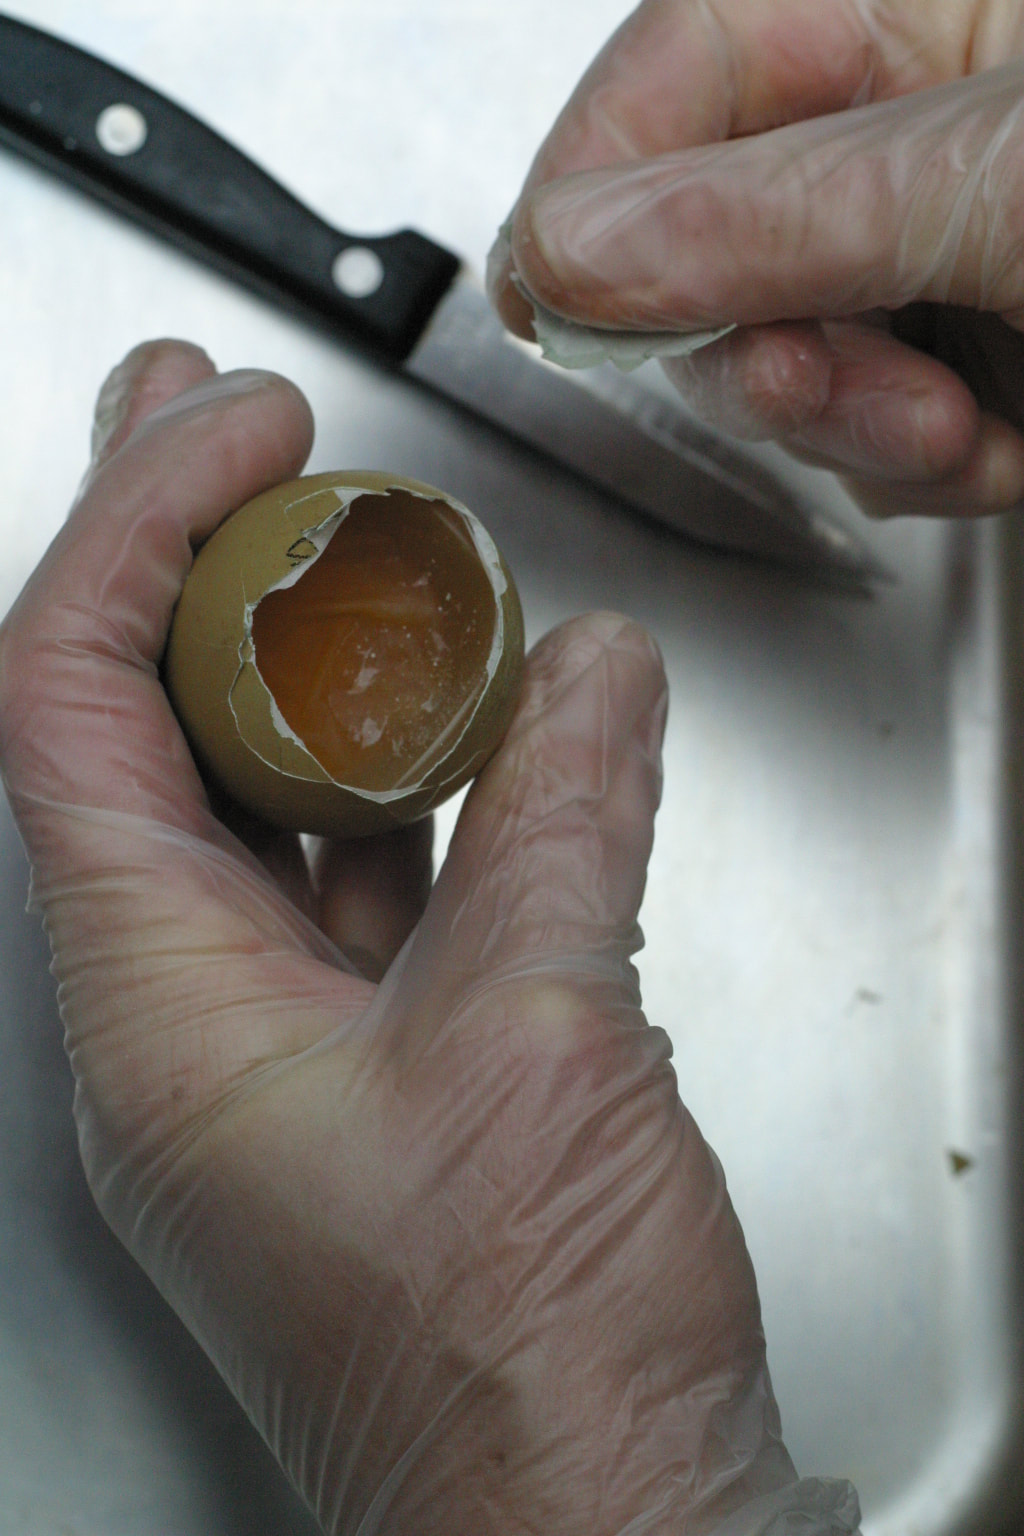
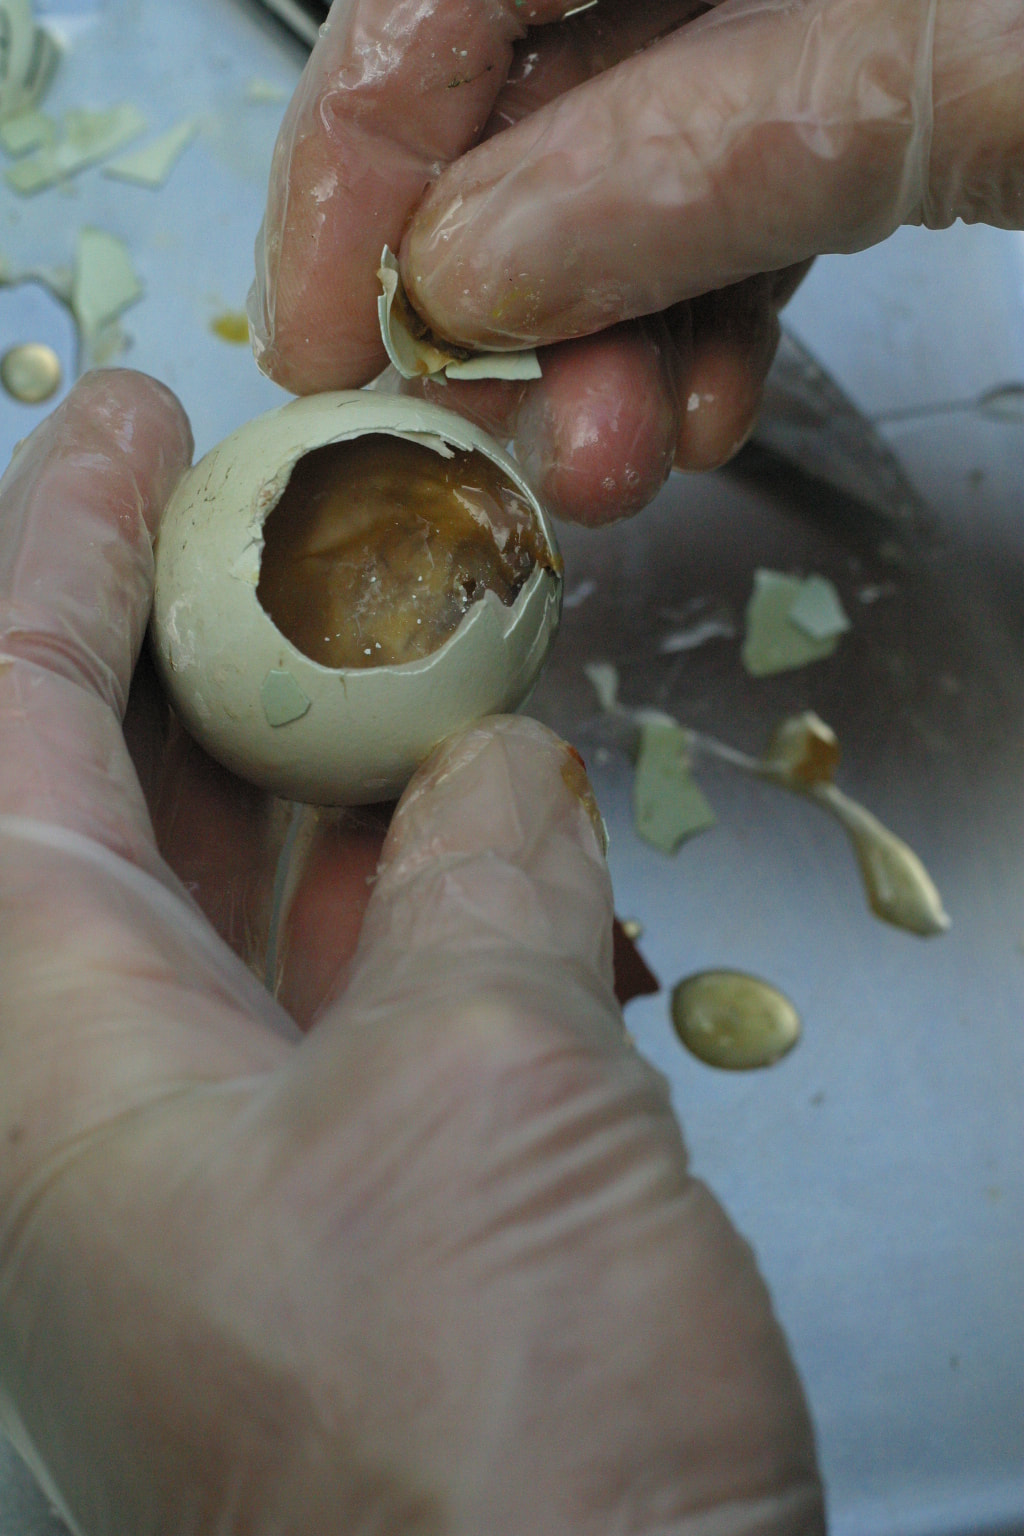
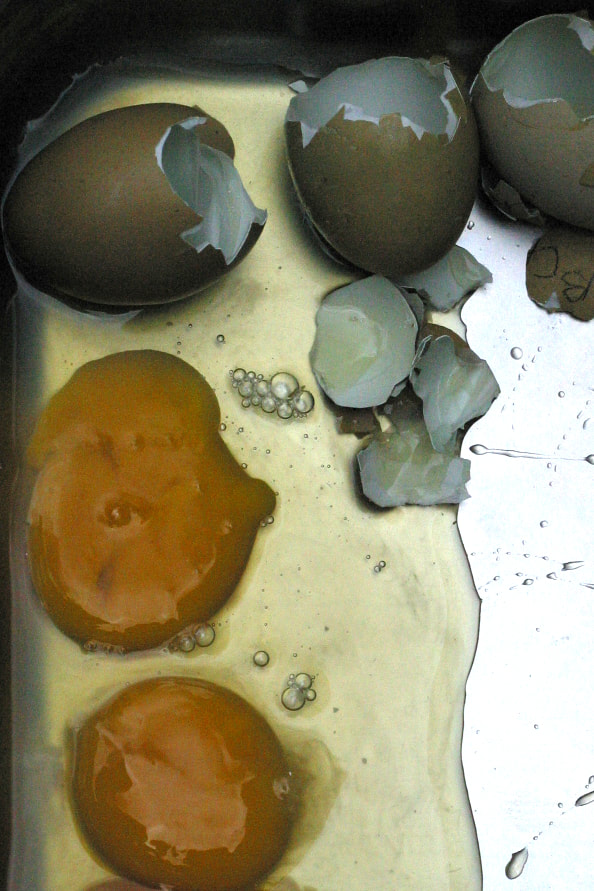
STEP TWO: Begin to gently peel the shell away from the embryo. At this point, you might find that the contents of the egg are mostly liquid and you can pour them into one of the trays to explore further. Or you will find an embryo that is fully developed, or close--continue peeling away the shell and membrane for a better look. STEP THREE: Examine your findings and take notes. Some things to observe and put in your notes: 1. How far along was the embryo? Here are some general indications of embryo age (you can also reference the chart later in this post):
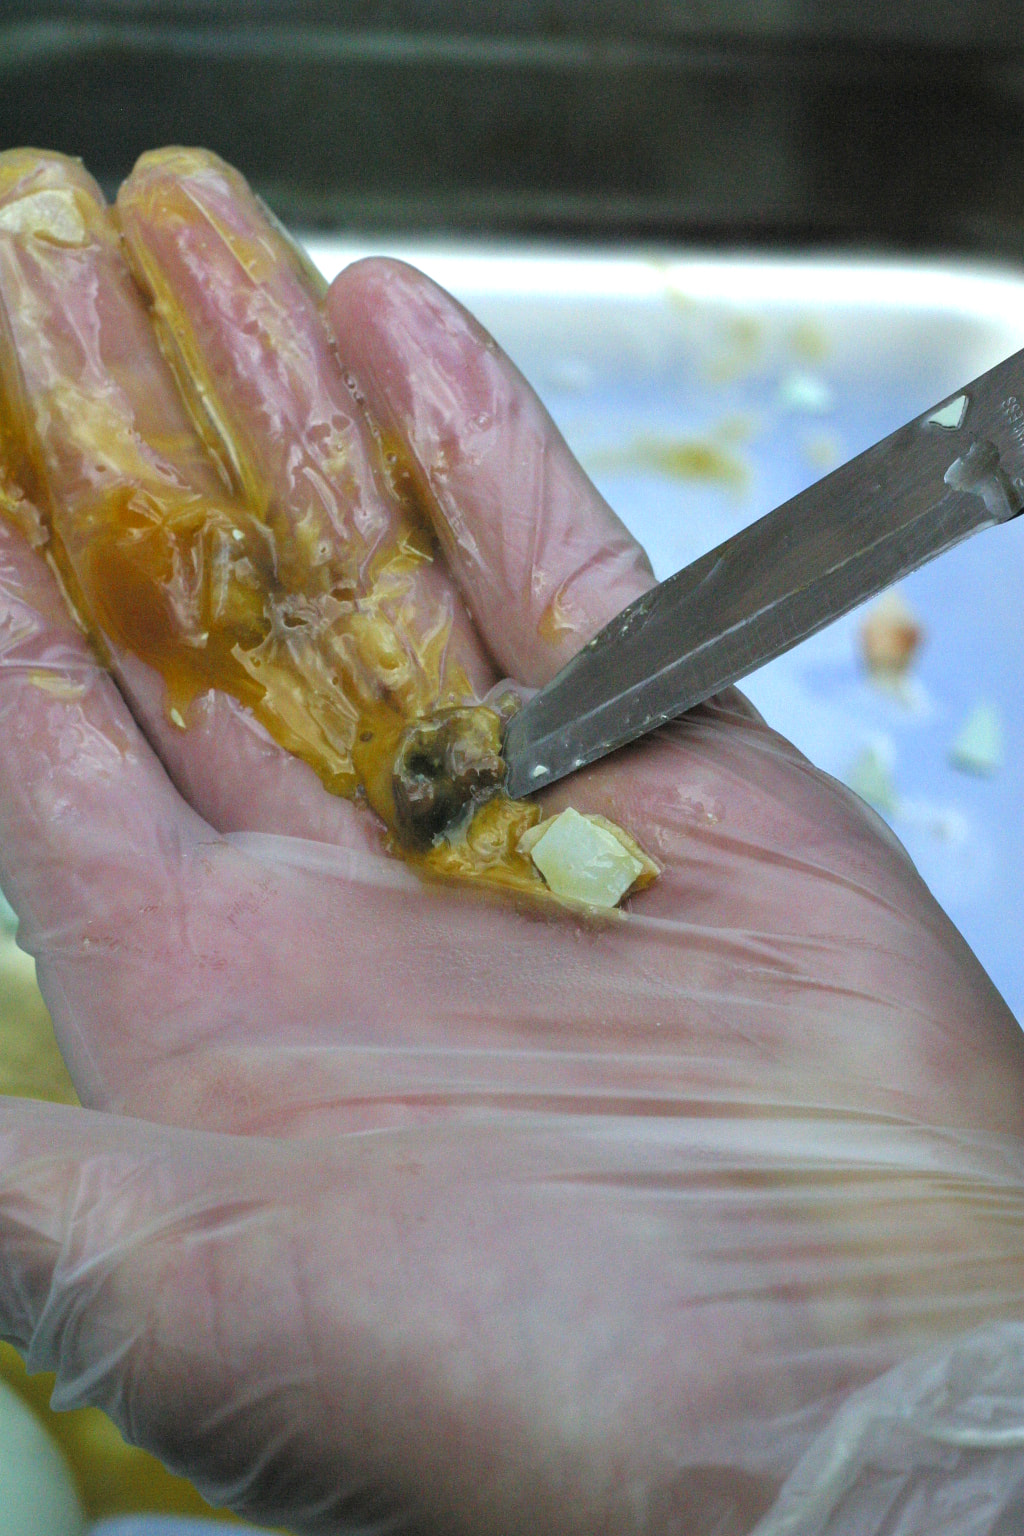
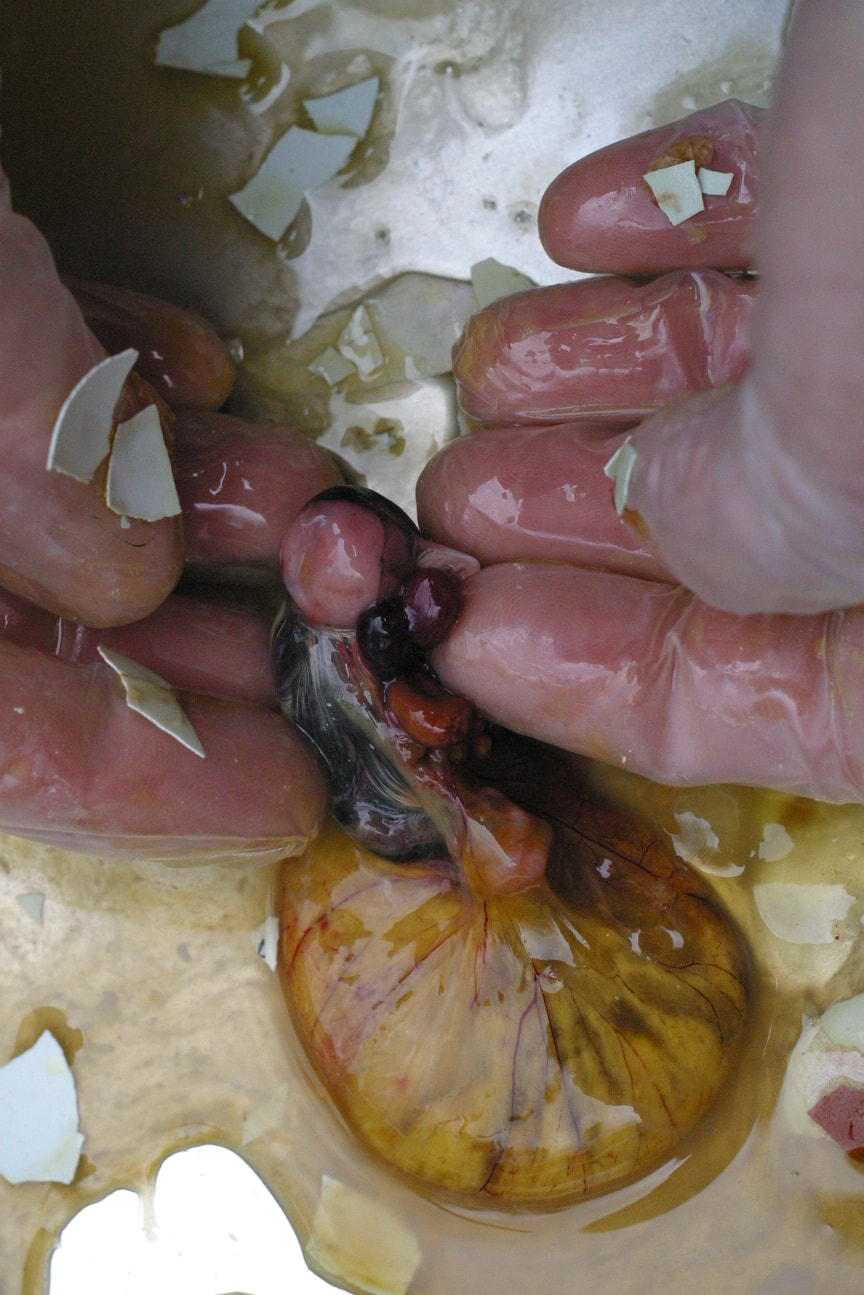
2. If the embryo was fully grown and died in the late stages of development, had it absorbed the yolk or not? Is it partially absorbed? The yolk is absorbed right before hatching, so this bit of info is a helpful clue. 3. Is there no development at all? This can signal infertility, shipping damage, or an egg that just stopped developing very early in the process. 4. Note any physical defects in the embryo. 5. If the embryo was fully developed, note it’s position. The correct position for lockdown is with the head under the right wing, at the large end of the egg, where the air cell is. 6. If you pedigree your eggs (label them to keep track of breeding groups/parentage), I would include that info in your notes as well, as you might discover some helpful information specific to certain birds or groups. STEP FOUR: Continue to examine each embryo and take good notes. I recommend using your first tray to open the eggs and study their contents, and then collect the embryos and eggshells you’ve already examined in the second tray. When you are done, you can bury the remains. STEP FIVE: Consider your findings. Do you see any patterns? For example, did many of the embryos stop developing at the same point? Do you have a large number of eggs that show no development at all, suggesting an issue with fertility or shipping? STEP SIX: Troubleshoot your hatch. Below are some common reasons why an egg may fail to develop or hatch. This is not an exhaustive list. For even more detailed coverage of this topic, I highly recommend the book “Hatching and Brooding Your Own Chicks” by Gail Damerow, as well as this article from the University of Florida.
Looking for patternsKeep in mind as you look at your notes and charts that many issues can cause development to stop at any point. That’s why it is helpful to think of an eggtopsy as a way to notice patterns. You may not be able to pinpoint the cause of death of every embryo, but the knowledge you gain will help you recognize patterns and train your eye. I do a breakout analysis on every hatch, because you just don’t know what you might find! Remember that it’s completely normal for some eggs to fail to develop or hatch. Since this is normal and a part of nature, there may not be anything for you to “troubleshoot” or “fix.” An occasional finding isn't a cause for concern; an “imperfect” hatch is just part of the process. When and if you find a pattern, then it's time to dig in and problem solve. Knowing your flock, your incubator, and any events that happened during incubation will help rule out certain causes. For example, maybe you had a short power outage just before lockdown, and a number of embryos died at that point. Or perhaps you know for a fact that your birds are getting great nutrition, so you can reasonably rule deficiencies out as a cause. Or maybe your eggtopsy indicates some humidity issues, so you put a back up hygrometer inside your incubator to give you two readings to go by for your next hatch. Eggtopsy examplesLet's look at a few examples from our own hatches to give you an idea of what you might find. I'll also share our thought processes as we considered possible causes, and what conclusions we drew from the evidence at hand.
Estimating Embryo AgeThe below images are from "Hatching and Brooding Your Own Chicks" by Gail Damerow. They will help you estimate the age of the embryos you are examining. 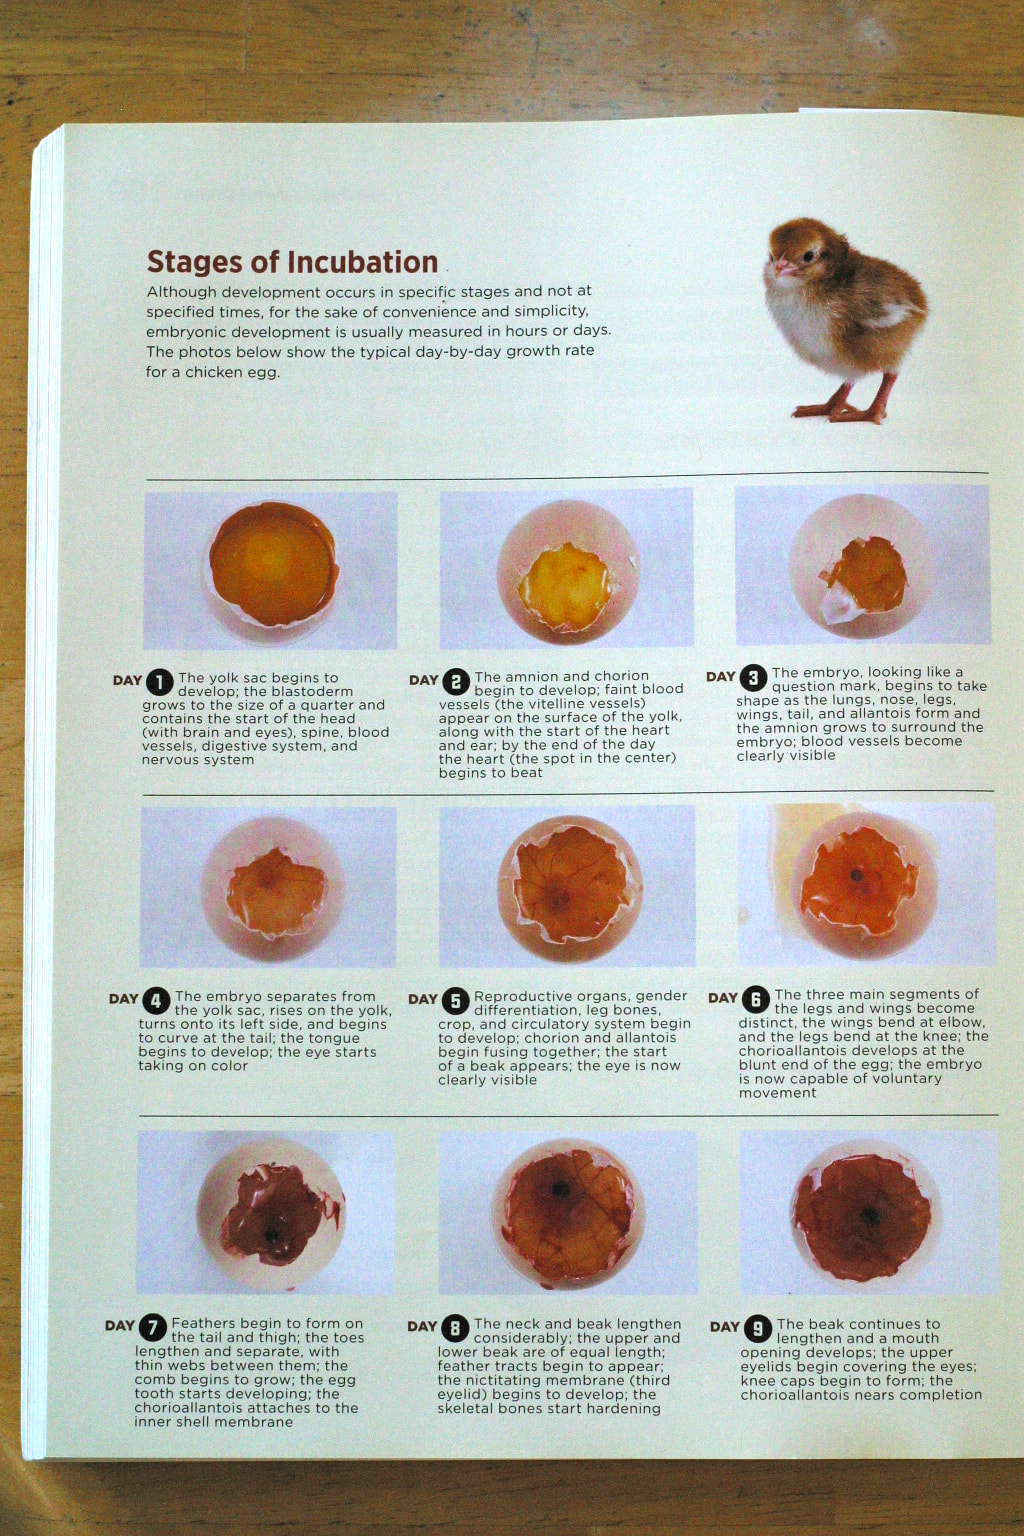 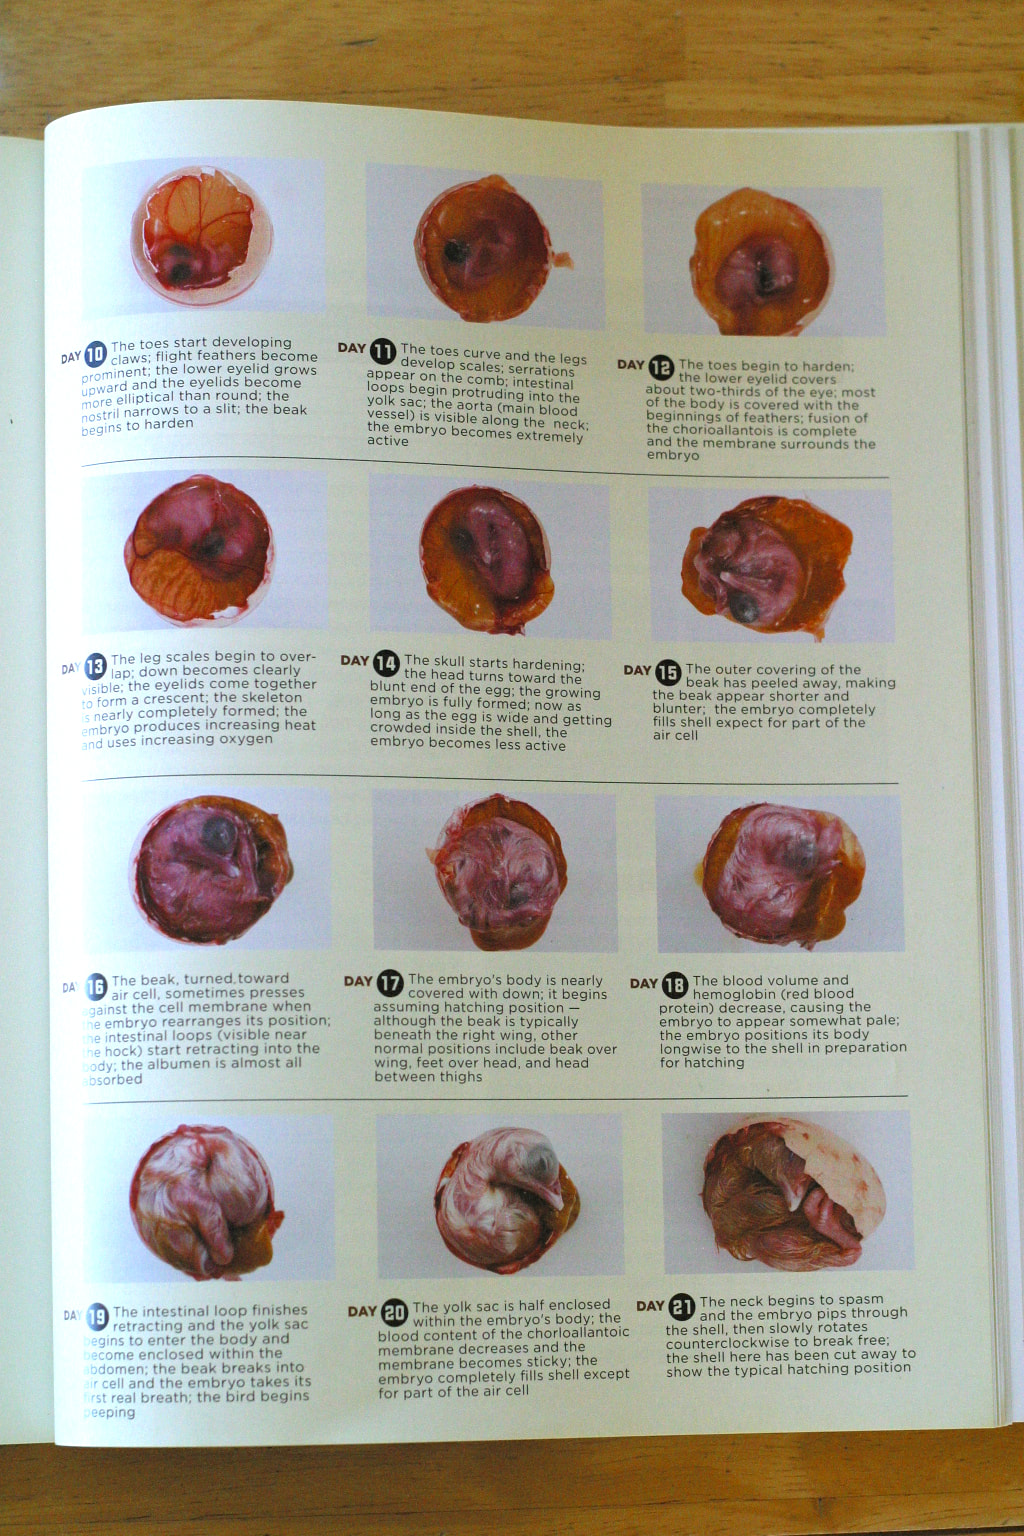 When to Eggtopsy?When is the hatch truly done? During a “textbook” hatch, chicks arrive on day 21 and hatch within a 24 hour period. Of course, most hatches aren’t textbook, and you’ll often have chicks hatching slightly earlier and slightly later than the 21 day mark.  Eggs from our Olive Egger hens. It’s up to you to decide how long you’ll give latecomers to zip out of their eggs. A few general hatch facts to keep in mind when decided when to stop incubating:
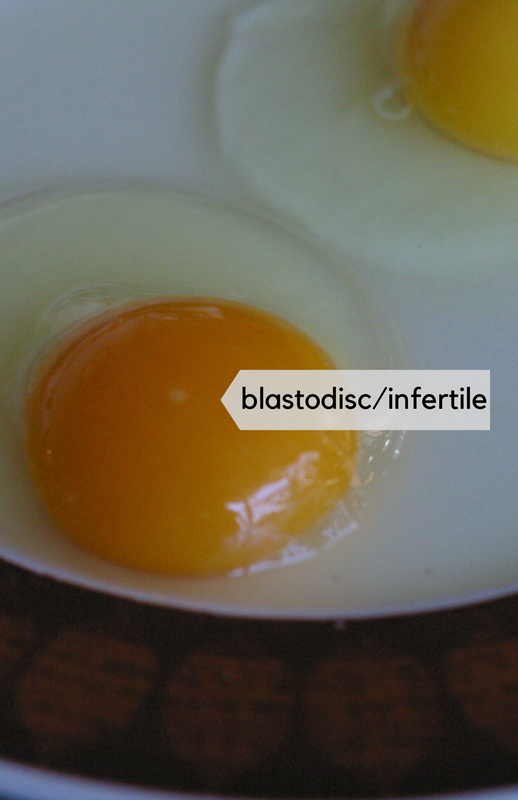
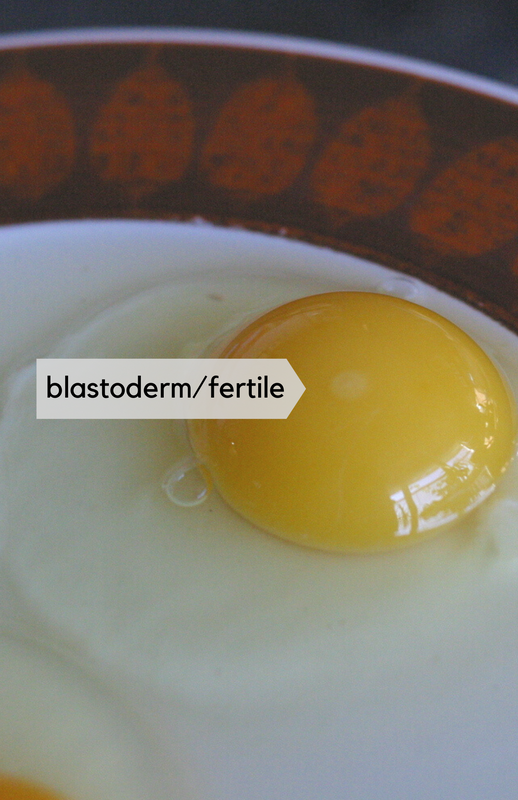
You can wait up to three days from the first hatch to remove your new chicks from the incubator, to allow for others to hatch. If you like, you can take chicks out at this point and let the rest of the eggs continue to incubate, just in case. In our own experience, our hatches are generally complete 48 hours after the first hatch, but chicks have been known to hatch as late as day 25. Once the hatch is done, we focus on getting the new babies vaccinated and settled in their brooders, and then we empty the incubator. I set the unhatched eggs aside and eggtopsy them the next day. Eggtopsy Safety ConsiderationsRotten eggs: Do not open any eggs that smell or are “sweating.” If at any point in incubation you notice eggs like this, quickly open the incubator, grab the egg with a plastic bag or paper towel, and dispose of the egg outdoors. These eggs are rotten and have the potential to explode, contaminating the incubator and wrecking your hatch. Gloves: Not everyone wears gloves for this process, but I recommend them. Why not? Kids: Someone asked me recently if it’s safe to do an eggtopsy with kids. Of course--if you and the kids are comfortable with that, it can be an excellent learning opportunity. As with any eggtopsy, I recommend gloves, and whatever other age appropriate precautions or reminders you would take with your kids in a potentially "gross" or messy situation. Eggshell Clues (from the ones that hatched!)The eggs that DID hatch are also a fount of information about the hatch. If possible, find the matching tops and bottoms of eggs that did hatch successfully. The proportions of the top and bottom of the egg, split where the chick zipped around the circumference of the egg, will give you valuable clues about the humidity levels of your hatch. 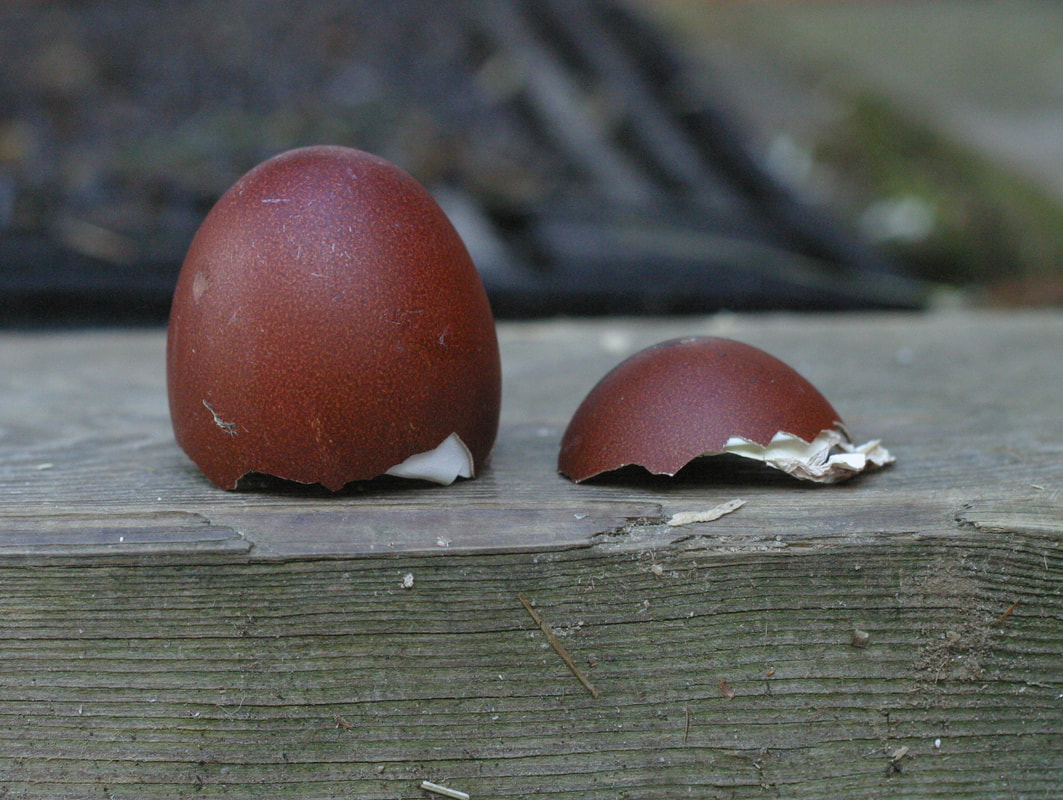 The cap is roughly half the size of the shell--indicating good humidity levels. If humidity levels were correct during incubation, then the bottom part of the shell after hatch will be about twice the size of the cap (the larger end of the egg where the air cell is located). If the cap is larger than that, humidity levels were too low. Smaller, and the humidity was too high. The size of the shell and cap after the hatch are indicative of how much the air cell grew during incubation--and air cell growth is directly related to humidity levels. (Some folks monitor these changes and make humidity adjustments during incubation through candling to check the air cell, or weighing the eggs to measure weight loss, but that’s a blog post for another day.) The Importance of Fertility ChecksIt’s a common misperception that if an egg does not develop, it wasn’t fertile to begin with. While that’s definitely a possibility, there are other reasons that an egg might appear completely undeveloped after incubation. A fertile egg can sustain damage in shipping that prevents it from developing, or an egg might be stored improperly or for too long. It’s also possible for a fertile egg to start and stop development so quickly that there are no signs at breakout. If you are hatching eggs from your own flock, checking for fertility BEFORE you incubate can help you rule out fertility issues when troubleshooting the hatch. Think of it as a pre-eggtopsy. You can check to see if your chicken’s eggs are fertile without incubating them, but the catch is that you have to break them open to do so. To check for fertility, take an egg and gently crack it open into a bowl. If the egg is infertile, you will see a small, uneven white dot on the yolk. This is called the blastodisc. If the egg is fertile, instead of a dot you will see a small, white, uniformly round bullseye or donut shape. This is called the blastoderm. If you don’t see a dot or a bullseye, carefully flip the yolk over with a spoon and check the underside. If this is your first time checking for fertility in this way, it can be helpful to compare your eggs to an egg you know is infertile, if available. Most store bought eggs are infertile. 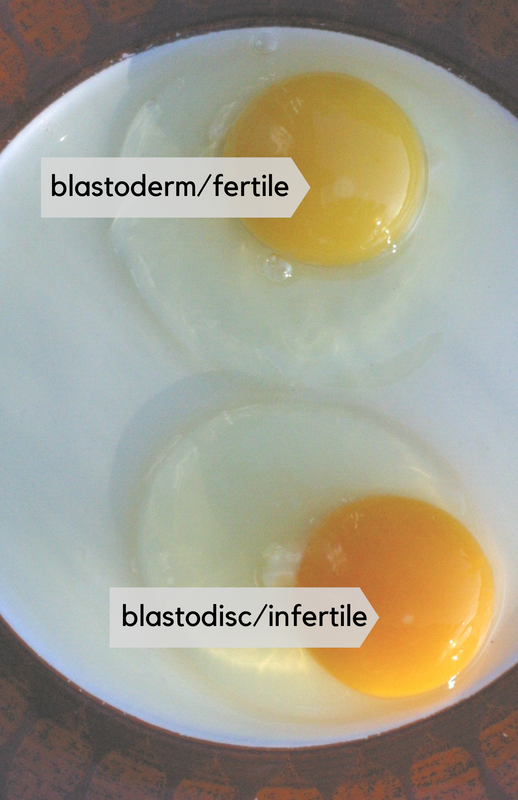 Checking for fertility this way is only accurate when eggs are fresh. After 21 days of incubation, the blastodisc or blastoderm is so degraded that it’s impossible to tell for certain if an undeveloped egg was fertile or not. During our breeding season, we spot check each breeding group weekly for fertility to ensure we are shipping and setting fertile eggs. While we rarely spot an issue, when we do we can be proactive in handling it within our flocks and with our customers. Fertility checks are a best practice for breeders, and also helpful if you are breeding at home. While it requires sacrificing a few eggs to breakfast, it will save you the trouble of waiting for chicks for three weeks only to discover your rooster isn’t doing his job.
So...are you ready to Eggtopsy?I hope this post is a starting point for you to add a new tool to your chicken keeping repertoire: the eggtopsy. While the idea of studying unhatched embryos can be intimidating or have an ick factor, I found it to be far easier than anticipated, and the knowledge gained is well worth the effort. If you have any questions, I’d love to hear them in the comments below. I’d also love to know if you’ve done eggtopsies in the past, or if you think you might try one after your next hatch!
11 Comments
Susan D St Louis
4/23/2022 07:30:58 am
Hello,I recently purchase shipped 14 ayam cemani fertile eggs .left them in incubator for 25 days with perfect temp and humidity with no fluctuation..did eggtopsy not a sign of embryo or blood ,they looked just like store bought eating eggs ..does that mean they were never fertile?I have hatched hundreds of eggs and never had this happen..breeder says not her fault and offered to ship more for half price and I pay shipping ??the eggs were not scrambled in shipping ,shells were patent ,yolks not broken Hi Susan! Great question. It's completely possible that the eggs were fertilized but experienced some other kind of issue in transit, like extreme temperatures, that damaged the eggs past the point of viability but kept the yolks intact. You could always ask the breeder how often they check for fertilization before repurchasing. Given the unpredictability of shipping conditions, I think their offer to reship at a discount is reasonable, if you're comfortable with it and they are otherwise reputable. is kiausiuku trynuk ir gaminami bezdalai,galima ju ir namuose pasigamint.Isvirus kietai kiausiuku trynukus,susmulkinus juos uzdengtame inde palaikyt keleta dienu siltai.Ir,pradengus kiausiuku trynukai ir bezdasi jau,bezdaliuku kvapiazas jau yra.O ir perdziama ir bezdama jau tai nuo pienuko,ypac kumeles ir mamytes.Aisku dar prie pienuko kiausiuku trynuku valgyt virtu,o jei ir dar kumeles pienuke ir mamytes pienuke virus kiausiuku trynukus be batymiazu,perdejimas oi kaip daznas buna ir labai daug! Galimagi kiausiuku virtu trynuku jau apsibezdejusiu,nusinest i mokykla,ypac per kuno kulturiaska isidejus dezuteje uzdaroje i trenigiasku kisene.Kai galima,truputy dezute kiausiuku bezduku pradaryt.Ir beveik visoj gi sportsaliazej gan greit pasklinda duju,bezdaliuku kvapiazas.Kas bazda,kas bazda vis taip daznai ir daug,ogi kiausiukai bezdukai bazda.Ir pribezdeta buna visa sportsaliaza,nereikia nei perdet.Tadgi perdekim ir bezdekim kuo dazniau ir daugiau! Ypac per kuno kulturiaska sportiaskinant su treningiaskais,juk duju tai yra bezdalu,reikia juk pagamint
Amber
5/10/2023 08:12:09 am
LOVE this post! Thank you! Quick question, with my last hatch I had most of the chicks hatch early. The remaining 6 never internally pipped but were fully developed. Whenever chicks start hatching my humidity spikes. Could that spike in humidity negatively impact the last few or by too high of humidity do you mean the humidity is too high throughout the incubation process?
Jessie
2/6/2024 02:41:30 pm
I’m wondering the same thing as amber. I just did a hatch and I’ve done plenty. Out of 31 eggs one passed after a small zip, I had 8 eggs left on day 22. Candled and seen movement in two. Left them all in. Still no pips at the end of day 22.
gediminas
11/21/2023 11:23:35 am
ne is visu kiausiuku issperda vysciukai,kai kurie isju,o ypac pramoninesebperdyklose ju nueina i bezdalu gamyba,taip pat buna ir kai vystuke perdi vysciukus.Is ju keleta ir apsibezda o ne issiperdi,ir einami tada tokieapsibezdeje kiausiukai bezdalu gamobon.O ypac taip buna gan daug tokiu kiausiuku pramoneninese didelese kiausiuku perdyklosose
I am curious if the bull's eye is gone already(as in not visible anymore) after a week in the incubator when you generally can perform the first candling?
Mary
4/2/2024 09:43:07 pm
At 3 days you can candle. You should see something that looks life a spider. If you don't see that then there isn't any development and there probably won't be.
Sandra C
3/23/2024 03:38:21 pm
Hello. We built a cabinet incubator and separate cabinet Hatcher. I placed 158 eggs on lockdown. We had 118 chicks hatch. The eggtopsy revealed fully formed chicks with little to no yolk absorbed some with most of it absorbed. They seemed shrink wrapped. At least 15 had pipped and were positioned correctly. We did open the bottom of the cabinet to remove the hoard of chicks that had hatched. We know the heat and humidity fluctuated slightly. We think this affected the hatch. Hatch two has gone about the same. I think we messed up again by opening the bottom cabinet to grab chicks. Do you have any tips for how to regulate the temperature in a cabinet Hatcher. Not incubator.
Angela
6/28/2024 09:58:30 am
Hello, I'm concerned that a duck who has laid on eggs 30 day but egg laying took 16 days & It's hot in Texas, could be passed away even though I believe a chicken grew. Moscovies do take longer but I have seen how devastated a mother duck can become if the eggs are gone (raccoon crossing). If they won't hatch will she eventually leave the nest?Thank you for your advise. Leave a Reply. |

Hi, I'm Maeg.Welcome to our blog! Categories
All
|

©
The Silver Fox Farm